01 >>>> LED MATRIX 32*8 s čipom MAX7219
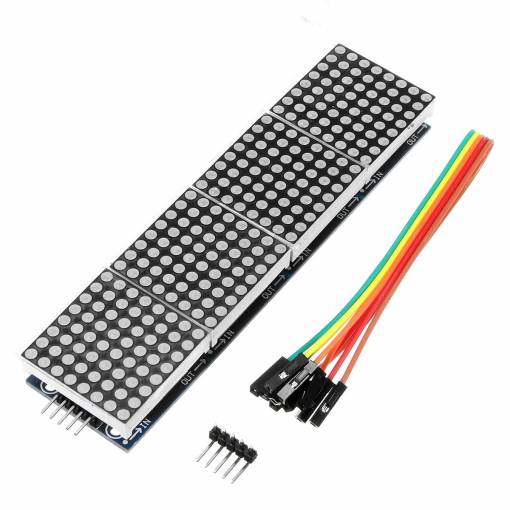
| zapojenie PIN max7219 | zapojenie PIN raspberry pico |
| VCC | 40 VBUS |
| GND | 38 GND |
| DIN | 5 GP3 |
| CS | 7 GP5 |
| CLK | 4 GP2 |
Poďme si vyskúšať oživiť display LED matrix 32*8 (8 bodov na výšku a na šírku 32). V prvom rade budeme potrebovať importovať knižnicu.
"""
MicroPython max7219 cascadable 8x8 LED matrix driver
https://github.com/mcauser/micropython-max7219
"""
from micropython import const
import framebuf

_NOOP = const(0)
_DIGIT0 = const(1)
_DECODEMODE = const(9)
_INTENSITY = const(10)
_SCANLIMIT = const(11)
_SHUTDOWN = const(12)
_DISPLAYTEST = const(15)

class Matrix8x8:
    def __init__(self, spi, cs, num):
        """
        Driver for cascading MAX7219 8x8 LED matrices.

        >>> import max7219
        >>> from machine import Pin, SPI
        >>> spi = SPI(1)
        >>> display = max7219.Matrix8x8(spi, Pin('X5'), 4)
        >>> display.text('1234',0,0,1)
        >>> display.show()

        """
        self.spi = spi
        self.cs = cs
        self.cs.init(cs.OUT, True)
        self.buffer = bytearray(8 * num)
        self.num = num
        fb = framebuf.FrameBuffer(self.buffer, 8 * num, 8, framebuf.MONO_HLSB)
        self.framebuf = fb
        # Provide methods for accessing FrameBuffer graphics primitives. This is a workround
        # because inheritance from a native class is currently unsupported.
        # http://docs.micropython.org/en/latest/pyboard/library/framebuf.html
        self.fill = fb.fill  # (col)
        self.pixel = fb.pixel # (x, y[, c])
        self.hline = fb.hline  # (x, y, w, col)
        self.vline = fb.vline  # (x, y, h, col)
        self.line = fb.line  # (x1, y1, x2, y2, col)
        self.rect = fb.rect  # (x, y, w, h, col)
        self.fill_rect = fb.fill_rect  # (x, y, w, h, col)
        self.text = fb.text  # (string, x, y, col=1)
        self.scroll = fb.scroll  # (dx, dy)
        self.blit = fb.blit  # (fbuf, x, y[, key])
        self.init()

    def _write(self, command, data):
        self.cs(0)
        for m in range(self.num):
            self.spi.write(bytearray([command, data]))
        self.cs(1)

    def init(self):
        for command, data in (
            (_SHUTDOWN, 0),
            (_DISPLAYTEST, 0),
            (_SCANLIMIT, 7),
            (_DECODEMODE, 0),
            (_SHUTDOWN, 1),
        ):
            self._write(command, data)

    def brightness(self, value):
        if not 0 <= value <= 15:
            raise ValueError("Brightness out of range")
        self._write(_INTENSITY, value)

    def show(self):
        for y in range(8):
            self.cs(0)
            for m in range(self.num):
                self.spi.write(bytearray([_DIGIT0 + y, self.buffer[(y * self.num) + m]]))
            self.cs(1)
Treba ju uložiť cez Thonny do raspberry pi pico, pod menom „max7219.py“.
Keď sme si vytvorili knižnicu pre komunikáciu s displejom, môžeme vytvoriť samotný hlavný program pre vypisovanie. Úplne fajn je nazvať ho „main.py“.
# naimportujeme si vytvorenú knižnicu max7219
# knižnica má jedinú chybu, nemá podporu diakritiky
import max7219
from time import sleep

# Import knižnice MicroPython pre PIN a SPI
from machine import Pin, SPI

# www.tkinter.eu
print("www.tkinter.eu")

spi = SPI(0, baudrate=10000000, polarity=1, phase=0, sck=Pin(2), mosi=Pin(3))
ss = Pin(5, Pin.OUT)

# Vytvoríme si inštanciu "display", ktorá má 4(tretí parameter) MAX7219 displeje.
display = max7219.Matrix8x8(spi, ss, 4)

#Nastavíme jas displeja. Hodnota od 1 do 15 (najjasnejšie).
display.brightness(8)

scrolling_message = "Ahoj svet, skusame VYPISOVAT TEXT"
#Zistíme dĺžku textu
length = len(scrolling_message)

#Vypočítame počet stĺpcov v texte
column = (length * 8)

#Vyčistíme display.
display.fill(0)
display.show()

# Vypísanie 4 znakového textu
display.fill(0)
# 1.prameter string na vypísanie, 2.na ktorom mieste bude vypisovaný text
display.text("PICO", 0, 0, 1)
display.show()

#sleep for one one seconds
sleep(1)

# Vypísanie textu na displeji z prava do ľava
# pokiaľ by ste chceli vypisovať text stále dookola, môžte pridať while cyklus
# while True:
for x in range(32, -column, -1):
        display.fill(0)
        display.text(scrolling_message , x, 0, 1)
        display.show()
        # rýchlosť, ako sa bude posúvať text po displeji
        # čím väčšia pauza, tým pomalšie bude vypisovať
        sleep(0.05)